
This function allows you to maintain products or services that your company purchase or sell. It is used when performing inventory related transactions such as Sales, Purchase and Stock transactions.
To access Product, click on the Master Data icon > Product.


Creating a new Product
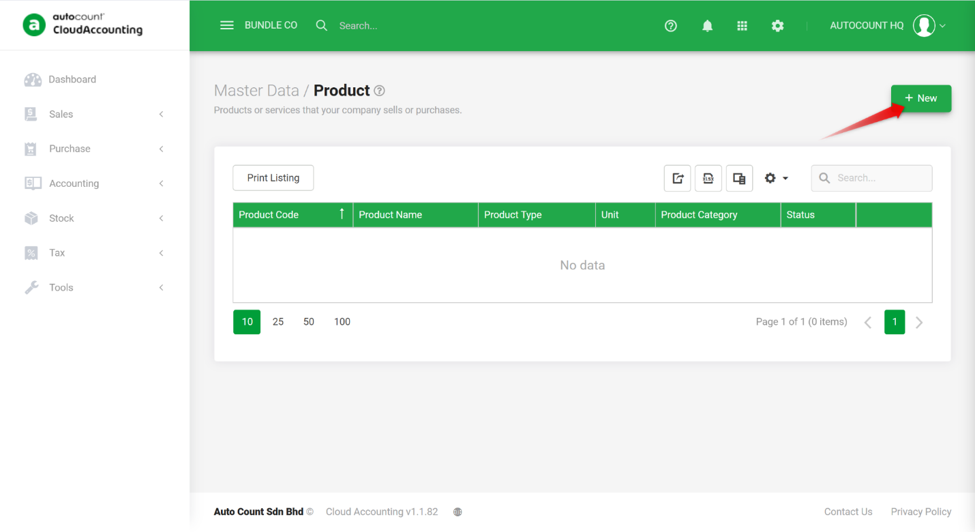
To create a new Product, click on the “+New” button.


Fields
Basic
Product Code: Key in your Product Code.
Product Type: Assign Product Type, select between “Inventory Product”, “Non-Inventory Product” and “Service Product”.
Unit: Key in Unit of measurement of this product.
Status: Indicate status of product, select between “Active”, “Inactive” and “Discontinued”.
Product Name: Key in product name or description.
Alternate Product Name: Key in alternate name or alternate description of this product.
Further Description: Key in any additional description of this product.
Note: Key in any additional note of this product.
Product Category: Select Product Category of this product.
Supplier: Select Supplier of this product.
Product Posting: Select Product Posting of this product.
Supply Tax Code: Select Supply Tax Code of this product. This tax code will be auto captured in Sales entries.
Purchase Tax Code: Select Purchase Tax Code of this product. This tax code will be auto capture in Purchase entries.
Tariff Code: Select Tariff Code of this product. This tariff code will be auto capture in tariff related entries.
Price: Key in selling price of this product.
Minimum Price: Key in minimum selling price of this product. You are not able to save Sales entries if the price used is lower than this price.
Cost: Key in cost of this product.
Barcode: Key in barcode of this product. This barcode can also be used as an alternate code during data input in transactions entries.
Image: Upload image of this product.
Click “Save” to commit the changes once you had done keying in or editing the required information.
Product Variants
Product variants is used when the product can be differentiated through certain elements such as colours, sizes, grades, shape, flavours etc. For example, a bottle of Chili Sauce can be differentiated into different level of spiciness. Currently the system able to support up to 2 levels of variants.
To do so, create a product – Chili Sauce:

To create the Level of spiciness, click on the “Product Variant”.

In the Product Variant page, tick on the checkbox “Enable Variant 1” and key in the Variant which you wish to differentiate, in this case SPICINESS. You can then add in how many levels of spiciness that your product could have by clicking on the “+” button.

If you have another level of variant that you wish to add, repeat the same by ticking on the checkbox for “Enable Variant 2”. For example, COLOUR, where you have Green Chili and Red Chili.

After setting up the variants, you will need to add your variants combination at the “Product Variants” section. You can click on “Add all Product Variants” and the system will auto generate the combination based on the variant option that had specified.

Any combination of variants at this section means that you can select it at your Purchase and Sales entries. You can also set different selling price and minimum selling price for different combination.
Product Multipack
The Product Multipack feature allows you to manage products with multiple units of measurement (UOM), such as Unit, Piece, Box, Carton, and more. This feature is useful when you sell the same product in different units under one product code, while inventory is automatically updated accordingly.
Follow the guide below to maintain a product with multiple UOMs.
Table of Contents
- Set Up Multipack
- Purchase Transactions with Product Multipack
- Sales Transactions with Product Multipack
- Generate Stock Card Report
Set Up Multipack
1. Go to Master Data > Product and click New to create a new product.
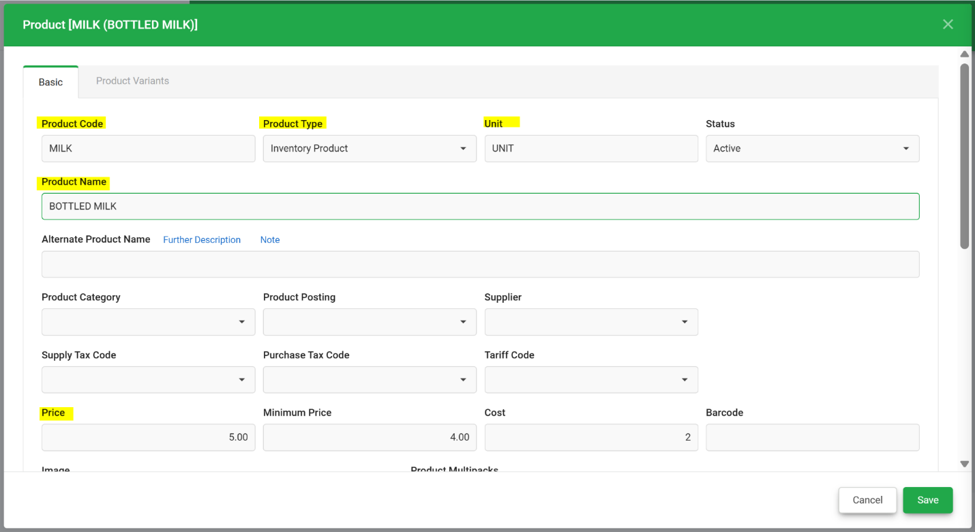
2. Enter the Product Code, Product Type, Product Name and other relevant details.
3. Define the Unit field. This is the smallest unit of the product, also known as the base unit.
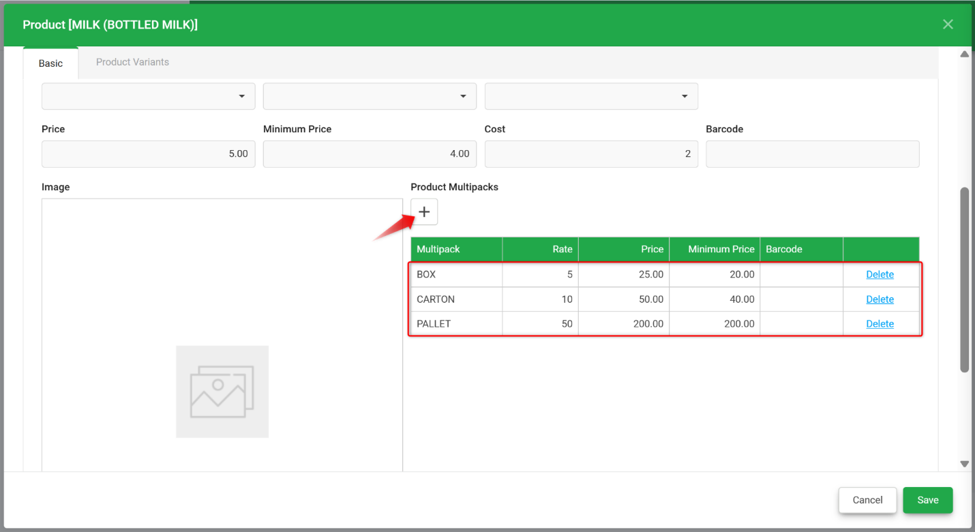
4. Scroll down to the Product Multipacks field.
5. Click + to add another UOM.
6. Enter the following details:
- Multipack: Enter the unit of measurement (UOM).
- Rate: Enter the conversion rate for the UOM. For example, if the UOM in the Multipack column is Box and 1 Box contains 5 Units, enter 5 as the rate. If 1 Carton has 10 units, then enter 10 as the rate.
- Price: The price will be automatically calculated: Price maintained above × Rate, e.g.: RM 5 × 5 = RM25. Alternatively, you can enter a different price.
- Minimum Price: The minimum price will be automatically calculated: Minimum price maintained above × Rate, e.g.: RM 4 × 5 = RM 20. Alternatively, you can enter a different minimum price.
7. Click Save.
Purchase Transactions with Product Multipack
The Unit option is available for both sales and purchase transactions, including Purchase Orders, Purchase Invoices, and Purchase Returns.
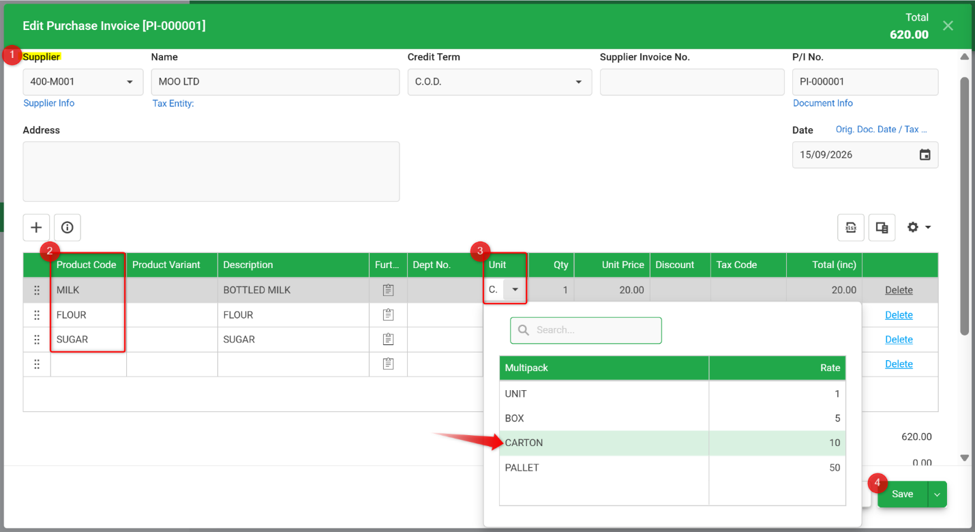
1. Go to Purchase Invoice and create a new transaction.
2. Select the Supplier, as applicable.
3. In the item details table, select a Product Code.
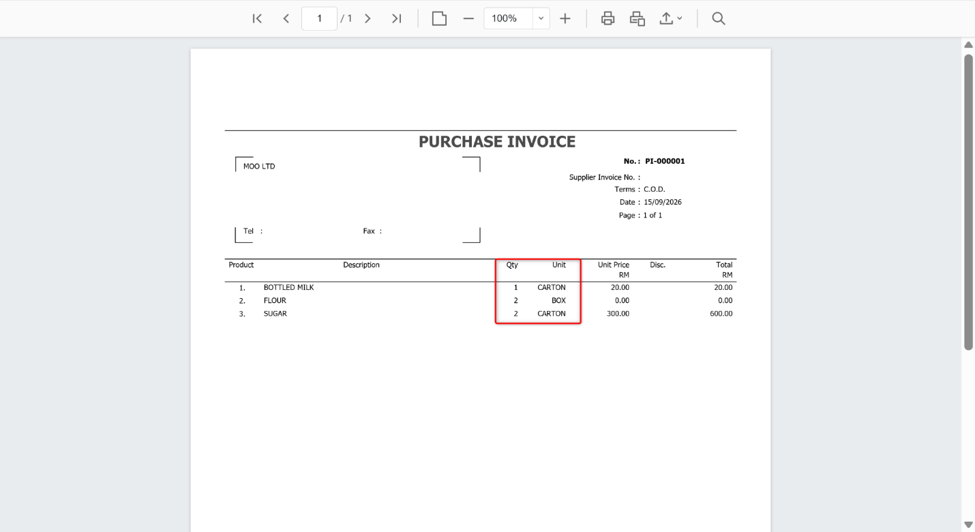
4. In the Unit column, click the drop-down list and select the required UOM. For example, select Carton to purchase 1 carton.
5. Click Save.
6. Click Print to print the document. The report will show the unit based on the UOM purchased.
Sales Transactions with Product Multipack
The Unit option is available for both sales and purchase transactions, including Quotations, Invoices and Credit Notes.
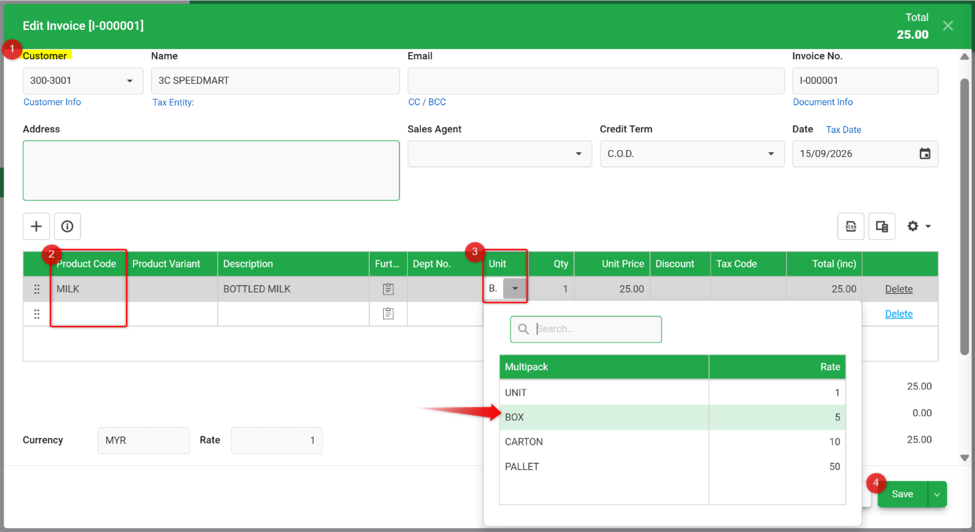
1. Go to Sale Invoice and create a new transaction.
2. Select the Customer, as applicable.
3. In the item details table, select a Product Code.
4. In the Unit column, click the drop-down list and select the required UOM. For example, select Box to purchase 1 box.
5. Click Save.
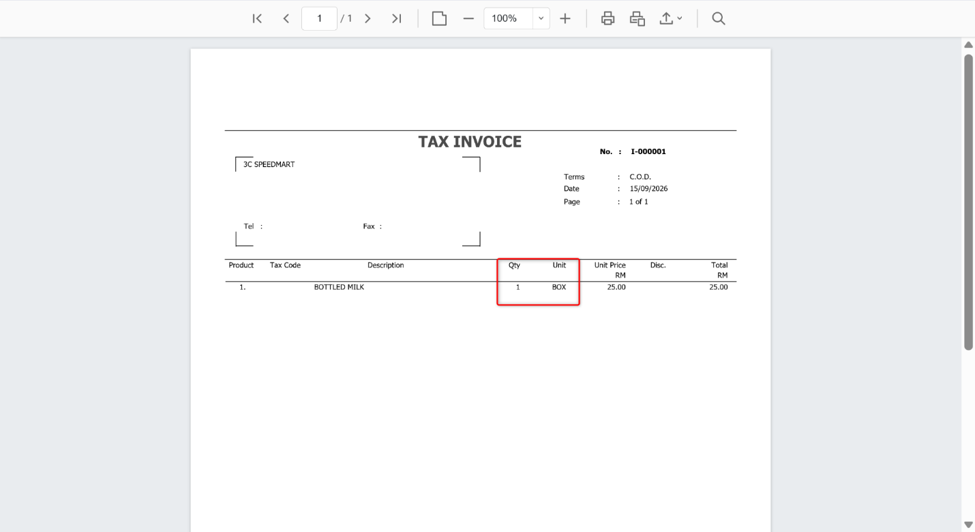
6. Click Print to print the document. The report will show the unit based on the UOM purchased or sold.
Generate Stock Card Report
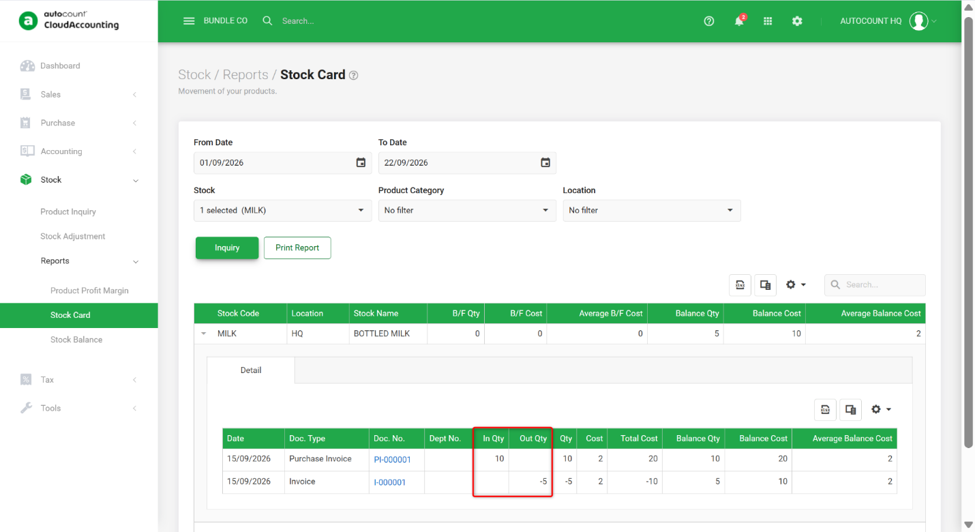
Go to Stock > Stock Card and click Inquiry.
The stock quantity is recorded using the base unit, which is the smallest UOM.
For example:
- If 1 Carton contains 10 Units and 1 Carton is purchased, the stock balance will increase by 10 Units.
- If 1 Box contains 5 Units and 1 Box is sold, the stock balance will decrease by 5 Units.
Prepared by Rui Harn & checked by Seck Voon
Product Bundle
The Product Bundle feature allows companies to group multiple individual products together and sell them as a single bundle. This allows you to sell multiple different items under a single selling price and simplifies transaction records, as you only need to select one main product instead of entering each individual item separately.
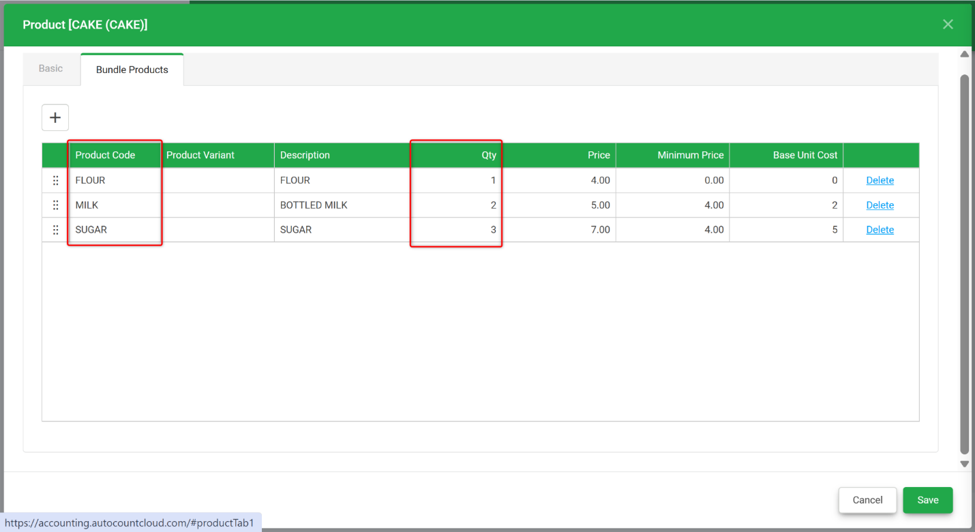
This feature is useful when offering promotional packs, gift packs, or hampers for sale. For example, a Cake Pack may include 1 bottle of milk, 2 bags of flour, and 3 packets of sugar. When one Cake Pack is sold, the quantities of all three individual products are included in the transaction, and the inventory for each product is automatically deducted accordingly.
Refer to the following guide for more details.
Table of Contents
Set Up Product Bundle
1. Go to Master Data > Product and create a new product.
2. Enter the Product Code, Product Name, and other relevant fields.
3. Under Product Type, select Product Bundle.
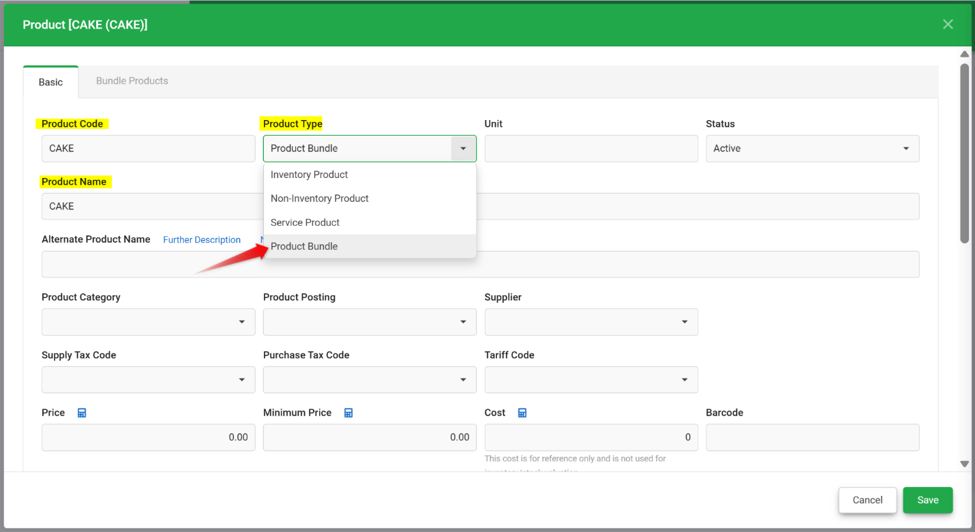
4. The Bundle Products tab will appear.
5. Go to the Bundle Products tab and click + to add the items required included in the bundle.
ℹ️ Note: Individual products must be created as Products first before they can be added to a Bundle Product.
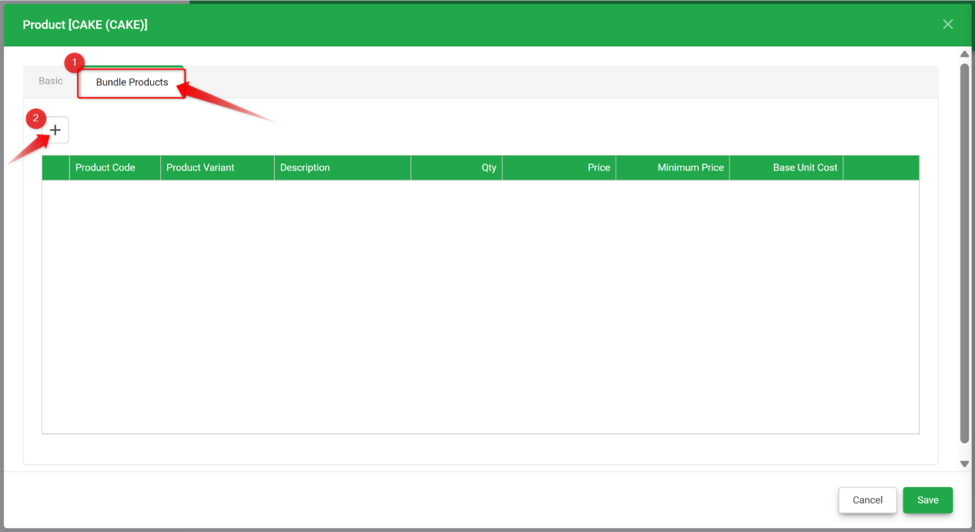
6. Select the Product Code and enter the Qty. The Price, Minimum Price, and Base Unit Cost columns will be automatically filled based on each of the individual product’s price and minimum price.
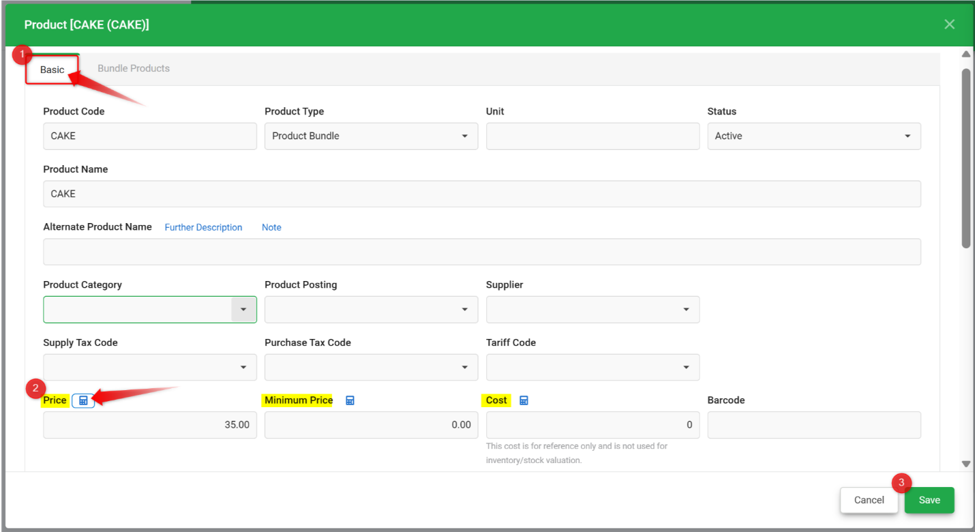
7. Return to the Basic tab. Under the Price, Minimum Price, and Cost fields, click the Calculator icon to automatically calculate the respective prices and cost based on the values entered in the Bundle Products tab. If the Product Bundle is offered at a lower price, you can edit the Price accordingly.
8. Click Save.
Sales Transaction with Product Bundle
A bundle product can be selected and applied in sales transactions such as Quotations, Invoices, and Credit Notes.
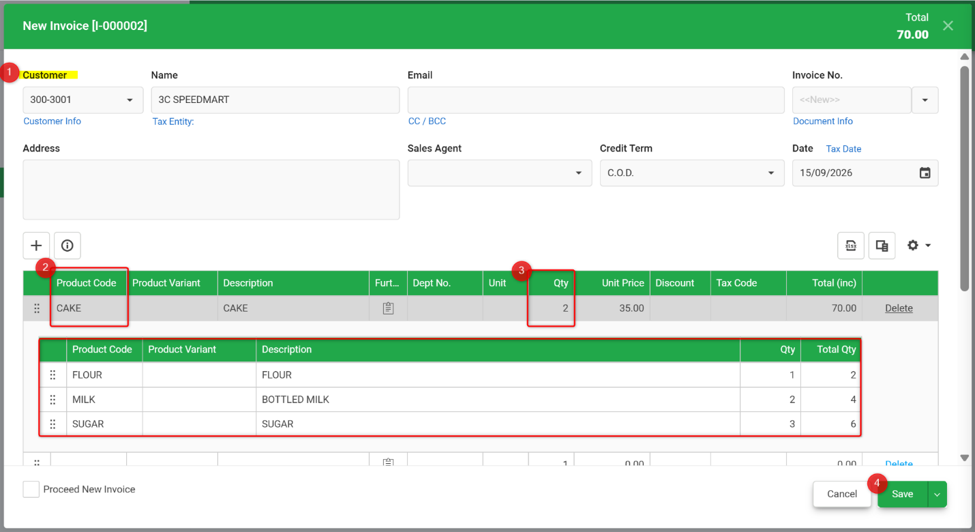
1. Go to Sales and create a new transaction.
2. Select the bundle product at the Product Code column and enter the Qty. The Unit Price will be automatically filled based on the product settings.
3. The individual products included in the bundle will be displayed.
4. Click Save.
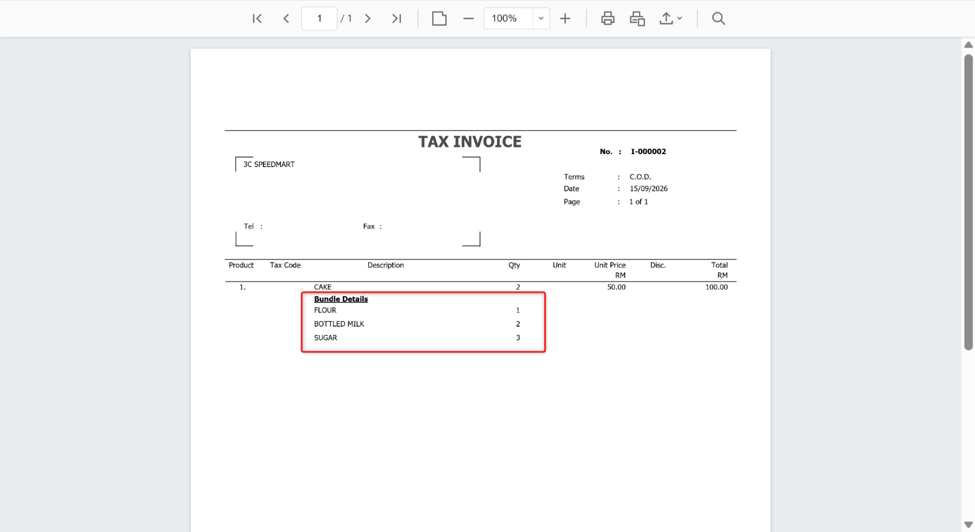
5. Click Print to print the document. The bundle details will be shown below.
Generate Stock Card Report
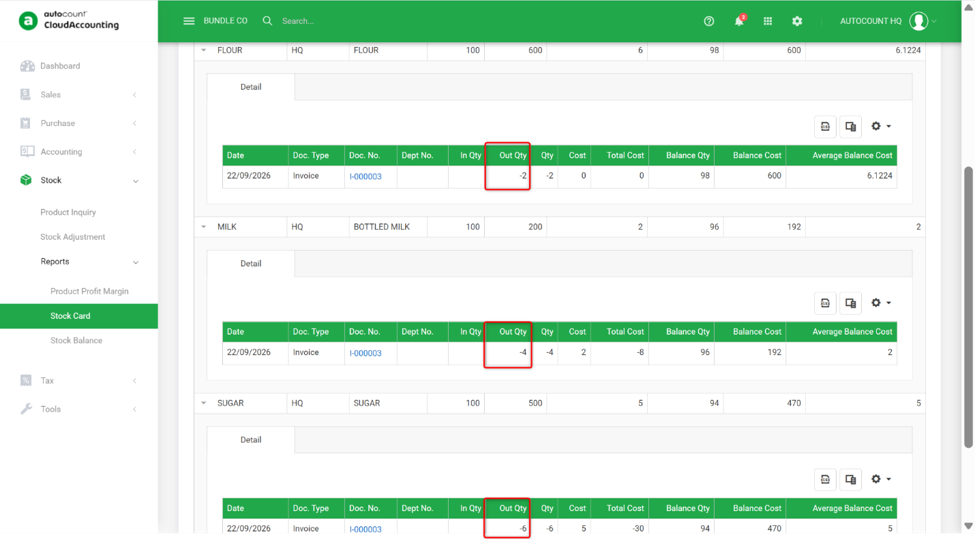
Go to Stock > Stock Card and click Inquiry.
The quantities of the individual products included in the bundle will be deducted accordingly.
Prepared by Rui Harn & checked by Seck Voon